
but I think it can be made with another Versions too.
You´ll need for this Tut:
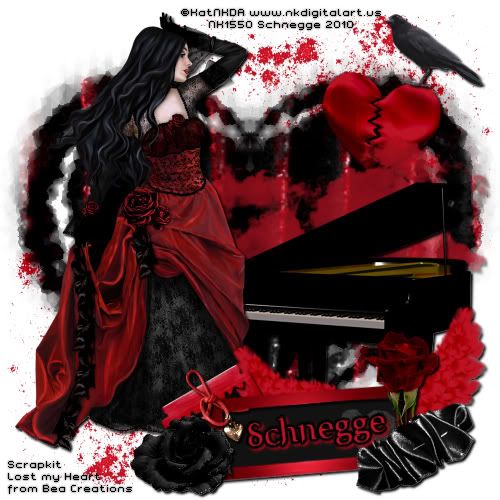
The PTU Scrapkit "Lost my Heart" from Bea Creations

1 Tube, the one i used is called Rose Red from
©KatNKDA www.nkdigitalart.us
Used with License NK1550
The Mask WSL_Mask171 from

*Thanks Hun*
Hope You understand the Tut, my English isn´t soooo good!
So let us begin ;)
At first two things:
After rezising you had to sharpen, so i don´t need to write it all time ;)
But when we have to rotate it will be sharpen after rotating ;)
At all elements i put a Dropshadow, which you want to use or if you want to use is your turn, i don´t write it in the Tut,
so if you want a Dropshadow feel free to use your own ;)
I used 2 - 2 - 100 - 3 - Black (on the Font i used as Colour #950814)
Open a new image 500 x 500 Pixel - fill with White and open the WSL_Mask171 which You can minimize.
Copy the Paper p06_bc_lostmyheart and paste as new Layer - Layer - new Masklayer from Image - WSL_Mask171 - ok and Merge Group - Image - resize 110% - Duplicate - Flip Vertical -
set the duplicatet Layer on Lightness (Legacy).
Copy piano01_bc_lostmyheart and paste as new Layer - Image - resize 50% - place it below on the Right Side on the Mask.
Copy katnkdaRoseRed02_40Proc (or Your own Tube) and paste as new Layer - Image - resize 38% - Flip Vertical - put she on the Left Side.
Copy glitter02_bc_lostmyheart and paste as new Layer - Image resize 50% - put it in the Upper right Corner - Put the Layer under the Mask - Layers - Duplicate - Flip Vertical and Horizontal.
Copy cloud02_bc_lostmyheart and paste as new Layer - Image - resize 70% - flip Vertical - put it at the Top from the Piano and put the Layer under the Piano - Layer -
set the Transparency from the Cloud on 75.
Copy heart02_bc_lostmyheart and paste as new Layer - Image - resize 40% - Rotate Free - 10 Right - put it at the Top on the Right Side at the Cloud and put the Layer under the Cloud - Layer.
Copy frame04_bc_lostmyheart and paste as new Layer - Image - resize 40% - Rotate Free - 85 Right - put it below on the Right Side -
Click with the Magic Wand in the Frame - Selections - Expand to 8 - Copy the Paper p09_bc_lostmyheart and paste as new Layer - Invert the Selection - Delete - Selections - None - put the Layer under the Frame - Layer -
Activate the Frame - Layer and merge one down visible.
Copy flower10_by_lostmyheart and paste as new Layer - Image - resize 40% - place it on the Right Side on the Frame.
Copy ribbon01_bc_lostmyheart and paste as new Layer - Image - resize 70% - Flip Vertical - put it below on the Right Side from the Frame.
Copy razorblade01_bc_lostmyheart and paste as new Layer - Image - resize 45% - Rotate Free - 30 Left - put it on the upper Left Corner of the Frame and put the Layer under the Frame - Layer.
Copy wings02_bc_lostmyheart and paste as new Layer - Image - resize 40% - Rotate Free - 10 Left - put it on the Right Side on the Frame (so the the Wing is at the Outer Side from the Piano) -
put the Layer under the Razorblade - Layer.
Copy flower05_bc_lostmyheart and paste as new Layer - Image - resize 20% - put it below on the Left Side from the Frame.
Copy heart05_bc_lostmyheart and paste as new Layer - Image - resize 40% - put the Knot from the Heart on the upper Left Corner from the Frame and put the Layer under the Flower05 - Layer.
Copy crow01_bc_lostmyheart and paste as new Layer - Image - resize 50% - Flip Vertical - put it on the Top on the Right Side at the Red Heart (Heart02).
Put your Text or Name in the Frame and type the Copyright on the Tag.
Save as png or jpg and you are finished with the Tag
You´r Pic is finished and i hope you have fun with it!
I think there are Tutorials look like this,
but this Tutorial i have not copy somewhere,
i have written it self and it´s mine!!!
© by Schnegge
10.01.2010
Keine Kommentare:
Kommentar veröffentlichen