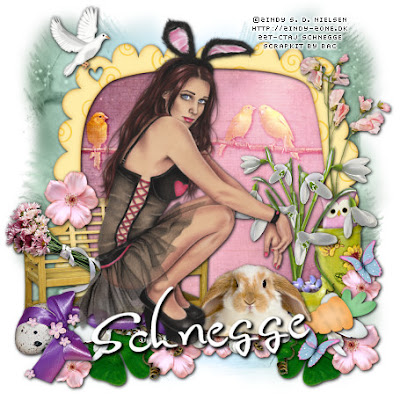
I made this Tut using PSP XI ,
but I think it can be made with another Versions too.
*************************************
You'll need for this Tut:
The PTU Kit "Lil Easter" from Broken Angel Creations
1 Tube, the one i use is
©Zindy S. D. Nielsen http://zindy-zone.dk
You can only use it with a License Number
The Mask WSL_Mask116 from http://weescotslasscreations.blogspot.com/
*Thank You Hun*
*************************************
So let us begin ;)
At first Three Things:
After rezising you have to sharpen, so i don't need to write it all time ;)
But when we have to rotate it will be sharpen after rotating ;)
At all elements i put a Dropshadow, which you want to use or if you want to use is your turn, i don't write it in the Tut,
so if you want a Dropshadow feel free to use your own ;)
I used this Drop Shadow 1 / 1 / 100 / 5 / Black
C/P means Copy / Paste ;)
- New Image 500 x 500 - Fill with White - Open Mask and minimize
- C/P Frame01_BAC_LilEaster as new Layer - Rezise 70% - Click with the Magic Wand in the Frame - Selections - Expand to 20 - New Rasterlayer -
C/P Paper17_BAC_LilEaster in the Selection - Selections - None - Layer under Frame Layer - erase with the Ruber what´s looking over the Frame (in the Hearts of the Corners).
- C/P Your Tube as new Layer and put in the frame (or in Front of).
- C/P Bench_BAC_LilEaster and paste as new Layer - Rezise 55% - below on the Left Corner on the Frame (I ut the Layer under the Tube Layer cause i put my Tube in Front of the Bench).
- C/P Birds_BAC_LilEaster as new Layer - Rezise 55% - near the Top in the Frame - Layer under Frame Layer (or Tube Layer, depends on Your Tube) - Layer Properties on Overlay.
- C/P Rabbit03_BAC_LilEaster as new Layer - Rezise 35% - on the Right Side from the Shoe of the Frame - Layer under Tube Layer (depends on the Tube).
- C/P Flower07_BAC_LilEaster as new Layer - Rezise 40% - on the Right Side on the Frame - Dulicate - Layer under Frame Layer - activate the upper Flower Layer and erase with the Rubber the below Part of the Stem.
- C/P Bouquet01_BAC_LilEaster as new Layer - Rezise 30% - on the Left upper Side on the Bench - Layer under Tube Layer (depends on Your Tube).
- C/P Carrot_BAC_LilEaster as new Layer - Rezise 35% - Flip Vertical - on below Right Corner - Layer under Rabbit Layer.
- C/P Egg01_BAC_LilEaster as new Layer - Rezise 35% - below on the Left Side on the Bench - Layer under Tube Layer (depends on the Tube).
- C/P Element02_BAC_LilEaster as new Layer - Rezise 45% - Rotate Free 90 Left - below on the Left Side on the Egg and so - Layer under Carrot Layer - Duplicate - Flip Vertical - move so that the Right Flower is under the Carrot (looks ike it has wings *lol*).
- C/P Shamrock_BAC_LilEaster as new Layer - Rezise 40% - below on the Left Side on the Element / Egg and so - Layer under Bench Layer - Duplicate - Flip Vertical (when You want erase the Stem with the Rubber).
- C/P Flower10_BAC_LilEaster as new Layer - Rezise 40% - above on the Right Side on the Frame - Layer under upper Flower07 Layer - erase with the Rubbe the below Part of the Stem which is on the Pink Owl from the Frame.
- C/P Dove_BAC_LilEaster as new Layer - Rezise 25% - on the upper Left Corner from the Frame.
- C/P Flower04_BAC_LilEaster as new Layer - Decorate Your Tag with it how You like.
- C/P Butterfly05_BAC_LilEaster as new Layer - Rezise 18% - place on the Right Shamrock - Duplicate - Flip Vertical and place below on the Right Side from the Frame / Shoe.
- Crop Your Image so that You have not too much white Place on the Sides, but leave a bit white Space cause we have to ad the BG with Mask now ;)
- Activate the white BG Layer - Selections All - New Rasterlayer - C/P Paper15_BAC_LilEaster in the Selection - Selections - None - New Masklayer from Image - WSL_Mask -
Merge down Group - Duplicate - Rezise 97% - activate the below Layer - Adjust - Blur - Gaussian Blur 5.
- Put your Text or Name on the Tag and type the Copyright on it.
(Don't forget the License Number when use a Tube which need one).
Save as png or jpg and you are finished with the Tag.
*************************************
I hope you liked it,
if there is something wrong or you didn't understand something
feel free to send me an Email
*************************************
I think there are Tutorials look like this,
but this Tutorial i have not copy somewhere,
i have written it self and it's mine!!!
© by Schnegge


Keine Kommentare:
Kommentar veröffentlichen